
 Reclaimed wood isn’t just about saving a few bucks or keeping materials out of landfills. It’s about bringing new life to your garden with pieces that carry a bit of character and history. Old pallets, barn boards, or even shipping crates have textures, colors, and quirks that add personality you just can’t get with fresh lumber.
If you’re looking to add charm and something eye-catching to your yard, reclaimed wood is the way to go. Whether you’re an experienced DIYer or just dabbling, you can try countless projects—some quick, others that invite a weekend of tinkering. This guide is loaded with ideas and practical tips to help you build garden art that stands out and means a little more. You’ll find all sorts of creative directions, from rustic to modern, and plenty of ways to stamp your own style on each piece.
Below, I’ll share some of my favorite creative ways to use reclaimed wood outdoors, with project inspiration, design advice, and easy-to-follow steps for making your own recycled masterpieces. No matter your skill level, you’ll find fun ways to give your garden a boost and let your creativity shine.
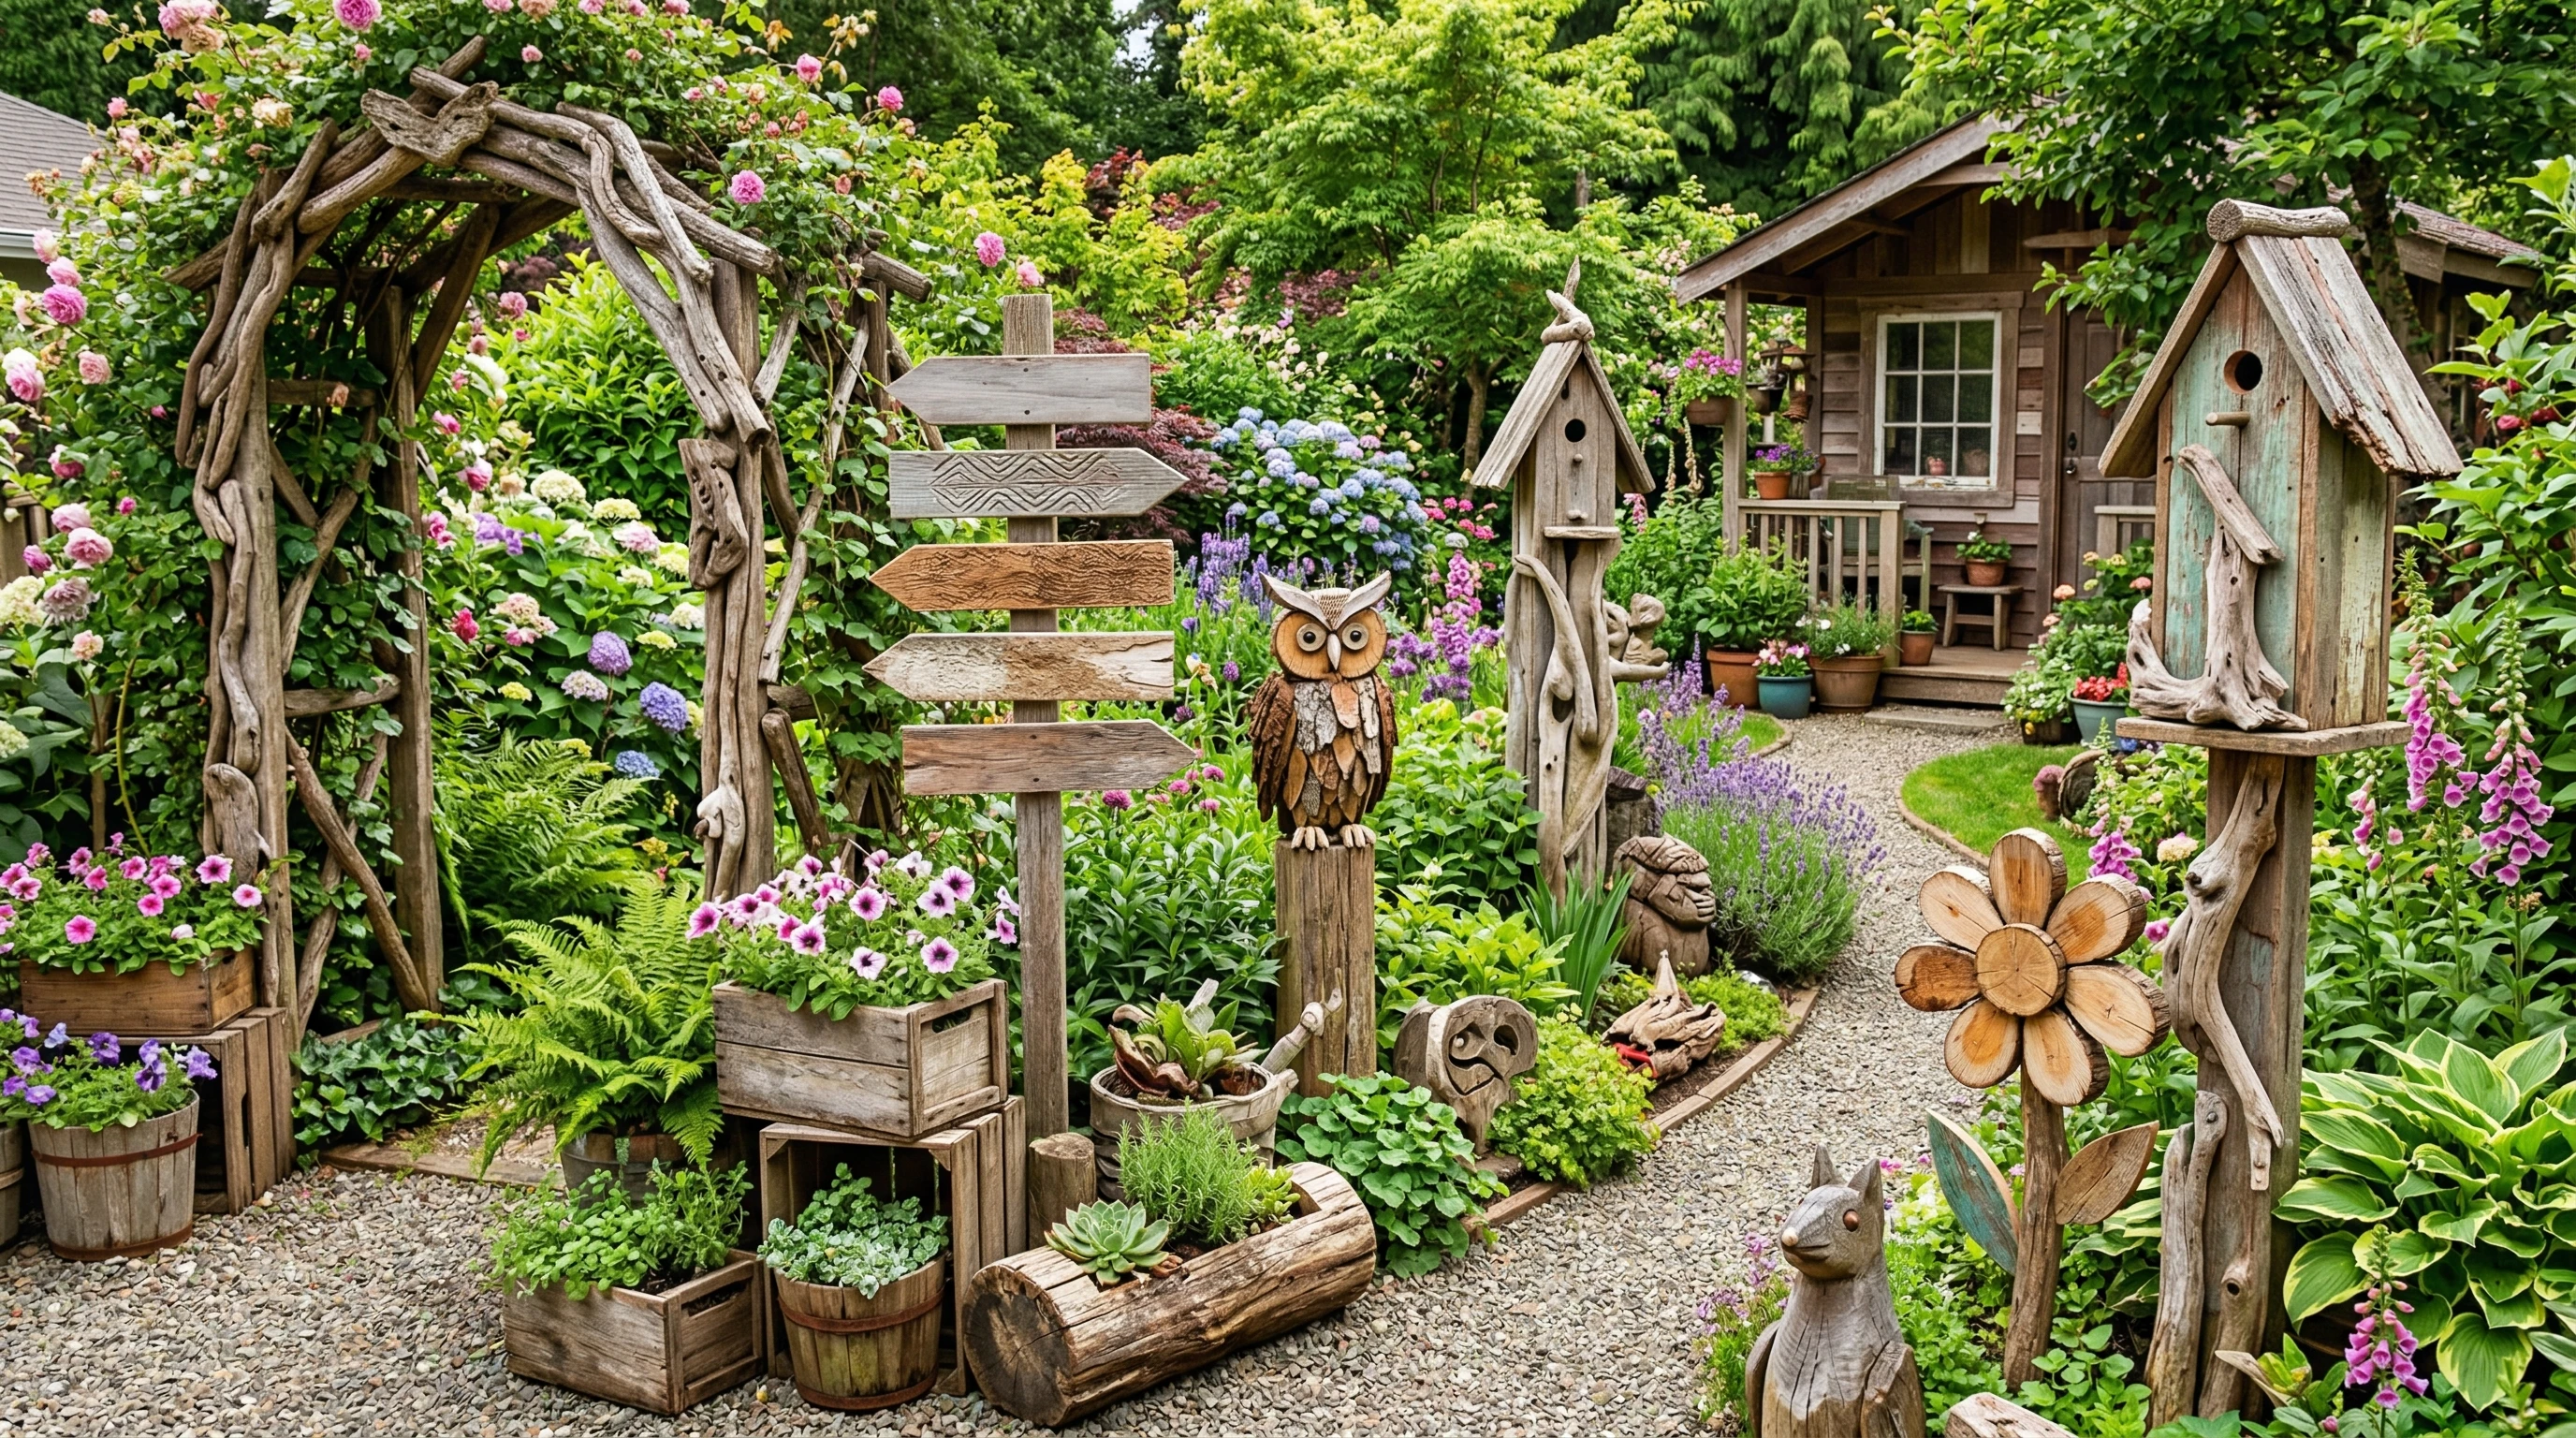
1. Rustic Garden Signs: Add a Personal Touch
Reclaimed wood practically begs to be turned into garden signs. Worn boards with old paint or faded markings already have that vintage look that new wood just can’t fake. DIY wooden signs work as plant markers, quirky welcome displays, or inspirational quotes set right among the flowers. With each sign, you get a piece of art that can tell visitors a story or make them smile.
How to Make It:
- Pick a piece that feels solid but weathered (think pallet slat or chunk of fencing).
- For text, you can freehand with acrylics, use a stencil, or try wood burning for a classic look.
- Seal painted surfaces with a clear outdoor sealer to protect from sun and rain and make them last longer.
- Attach the sign to a stake, or drill holes and tie it up with twine or wire for a hanging version.
Personalized signs also make thoughtful gifts for garden-loving friends or family, making each outdoor space special.
2. Sculptures and Yard Art: Let Your Imagination Run Wild
One of the coolest things about reclaimed wood is how its odd shapes practically invite creativity. Old beams, branches, or furniture parts can be mixed together into abstract sculptures, animals, or playful garden creatures—whatever sparks your imagination.
Project Ideas:
- Stack and attach cutoffs into a totem pole; paint faces or patterns for a bold effect.
- Glue or screw narrow strips into a rustic sunburst or star for a striking focal point.
- Turn two or three planks into a giant wooden flower with rounded petals for whimsical garden art.
- Piece together geometric shapes or minimalist forms for a modern twist on yard art.
Getting creative with finishes, adding splashes of color, or letting the natural grain show really brings these projects to life. Feel free to mix in found metal, river stones, or old hardware for bonus texture and extra visual interest.
3. Vertical Planters and Living Walls: Maximize Small Spaces
Reclaimed wood is perfect for putting together vertical planters or living walls. These are especially handy if your garden space is tight or if you just want to dress up a boring fence or outside wall. Vertical builds offer a wonderful way to grow more without taking up valuable ground space and can transform even the smallest yard into a lush oasis.
How to Build a Simple Vertical Planter:
- Start with two or three reclaimed boards as a backing.
- Attach small wooden boxes or pockets built from leftover scraps; make sure every container has drainage holes.
- Hang the whole piece with sturdy brackets or screw it directly to a wall or fence post for stability.
- Fill with flowers, herbs, or trailing plants for a living piece of wall art that gets better as it grows.
For a classic touch, try planting only one type of flower in each row for a neat, striped effect—or mix in colorful succulents and ferns for variety and texture. These planters also make excellent gifts and conversation starters.
4. Trellises and Garden Structures: Combine Function and Style
Trellises made from old wood are both useful and seriously good looking. They help climbing plants like peas or clematis and can create privacy or separate different parts of your yard without seeming out of place. Building a trellis from reclaimed wood brings organic style to your landscaping, and you can shape it almost any way you want.
Quick Steps for a DIY Reclaimed Wood Trellis:
- Select planks that are in decent shape; pallet slats work great here.
- Arrange in a grid, diamond, or fan pattern, then nail or screw together securely.
- Stabilize with vertical side boards and anchor the trellis in the soil with stakes to keep it upright.
- Leave the wood unfinished for rustic appeal, or whitewash for that sought-after cottage vibe.
Trellises like this are super versatile. Build an archway, a fence screen, or even a backdrop for a garden bench to create separate rooms in your yard or add vertical interest anywhere.
5. Birdhouses and Insect Hotels: Support Local Wildlife
There’s something satisfying about turning wood scraps into shelter for birds or beneficial bugs. These little builds don’t need much material or complicated tools, but they pay off by attracting pollinators and giving birds a cozy home. They’re not only functional but also bring more life and sound to your garden space.
Tips for Building:
- Use untreated wood to keep wildlife safe from chemicals.
- Drill a small entry hole for birds, or stack little logs and bamboo for insect homes.
- Rough up the wood with sandpaper or leave the grain so insects have places to hide and nest.
- Mount birdhouses at least 5 feet off the ground, out of reach of predators.
Keeps things natural; paint isn’t needed, but you can add a weatherproof finish if you want the project to last longer. Over time, you’ll notice more pollinators, ladybugs, and native birds stopping by.
6. Garden Benches and Seating: Relax in Style
Reclaimed wood is an awesome choice for building custom benches or even funky little stools for your backyard. Old beams, fence posts, or stair treads are sturdy enough for seating and add loads of character to your garden hangout space.
Easy Wooden Bench Project:
- Pick out two chunky planks for the seat and back, plus shorter scraps for the legs or supports.
- For a classic rustic bench, leave saw marks and knots visible for that authentic look.
- Screw or bolt the pieces together firmly; these boards are usually heavier than you think.
- Add a clear deck sealer or wood oil to help prevent rotting, especially if the bench will stay outside year round.
Custom seating from reclaimed wood feels inviting and can be made to fit any corner of your garden. Throw on some outdoor cushions, and you have a unique spot to relax, read, or sip coffee on sunny mornings.
7. Pro Tips for Working With Reclaimed Wood Outdoors
Before jumping into your first project, a little prep can make all the difference. Reclaimed wood comes with its own quirks: nails, dirt, old paint, and each piece tells a story. Here’s how I make sure my builds look great and hold up outside:
- Clean thoroughly. A wire brush or sandpaper helps knock off dirt, and soapy water with a rinse finishes the job. Let wood dry fully before using it.
- Remove old nails, staples, or screws for safety. I use pliers or a nail puller and always double-check so I don’t hit metal with power tools.
- Seal exposed surfaces with an outdoor wood protector. UV rays, rain, and freeze-thaw cycles can wear down even the sturdiest wood without a weatherproof coating.
- Plan for drainage. For planter boxes or signs, drill drain holes so water doesn’t collect and rot the wood.
Even boards that are pretty rough can be transformed with a little TLC and imagination. Don’t be afraid to experiment—sometimes a quirky flaw in the wood becomes your design’s best feature!
Final Thoughts
Reclaimed wood gives every garden project a unique story. These ideas are just the start—once you see how much personality old wood can bring to your yard, it’s hard to stop making things. If you’re new to working with reclaimed materials, start small and see where your creativity takes you. There’s no right or wrong when building something you’re proud to display outdoors.
If you have a favorite reclaimed wood project or a tip to share, I’d love to hear about it. Drop it in the comments below and let’s trade inspiration for our next outdoor creations!