
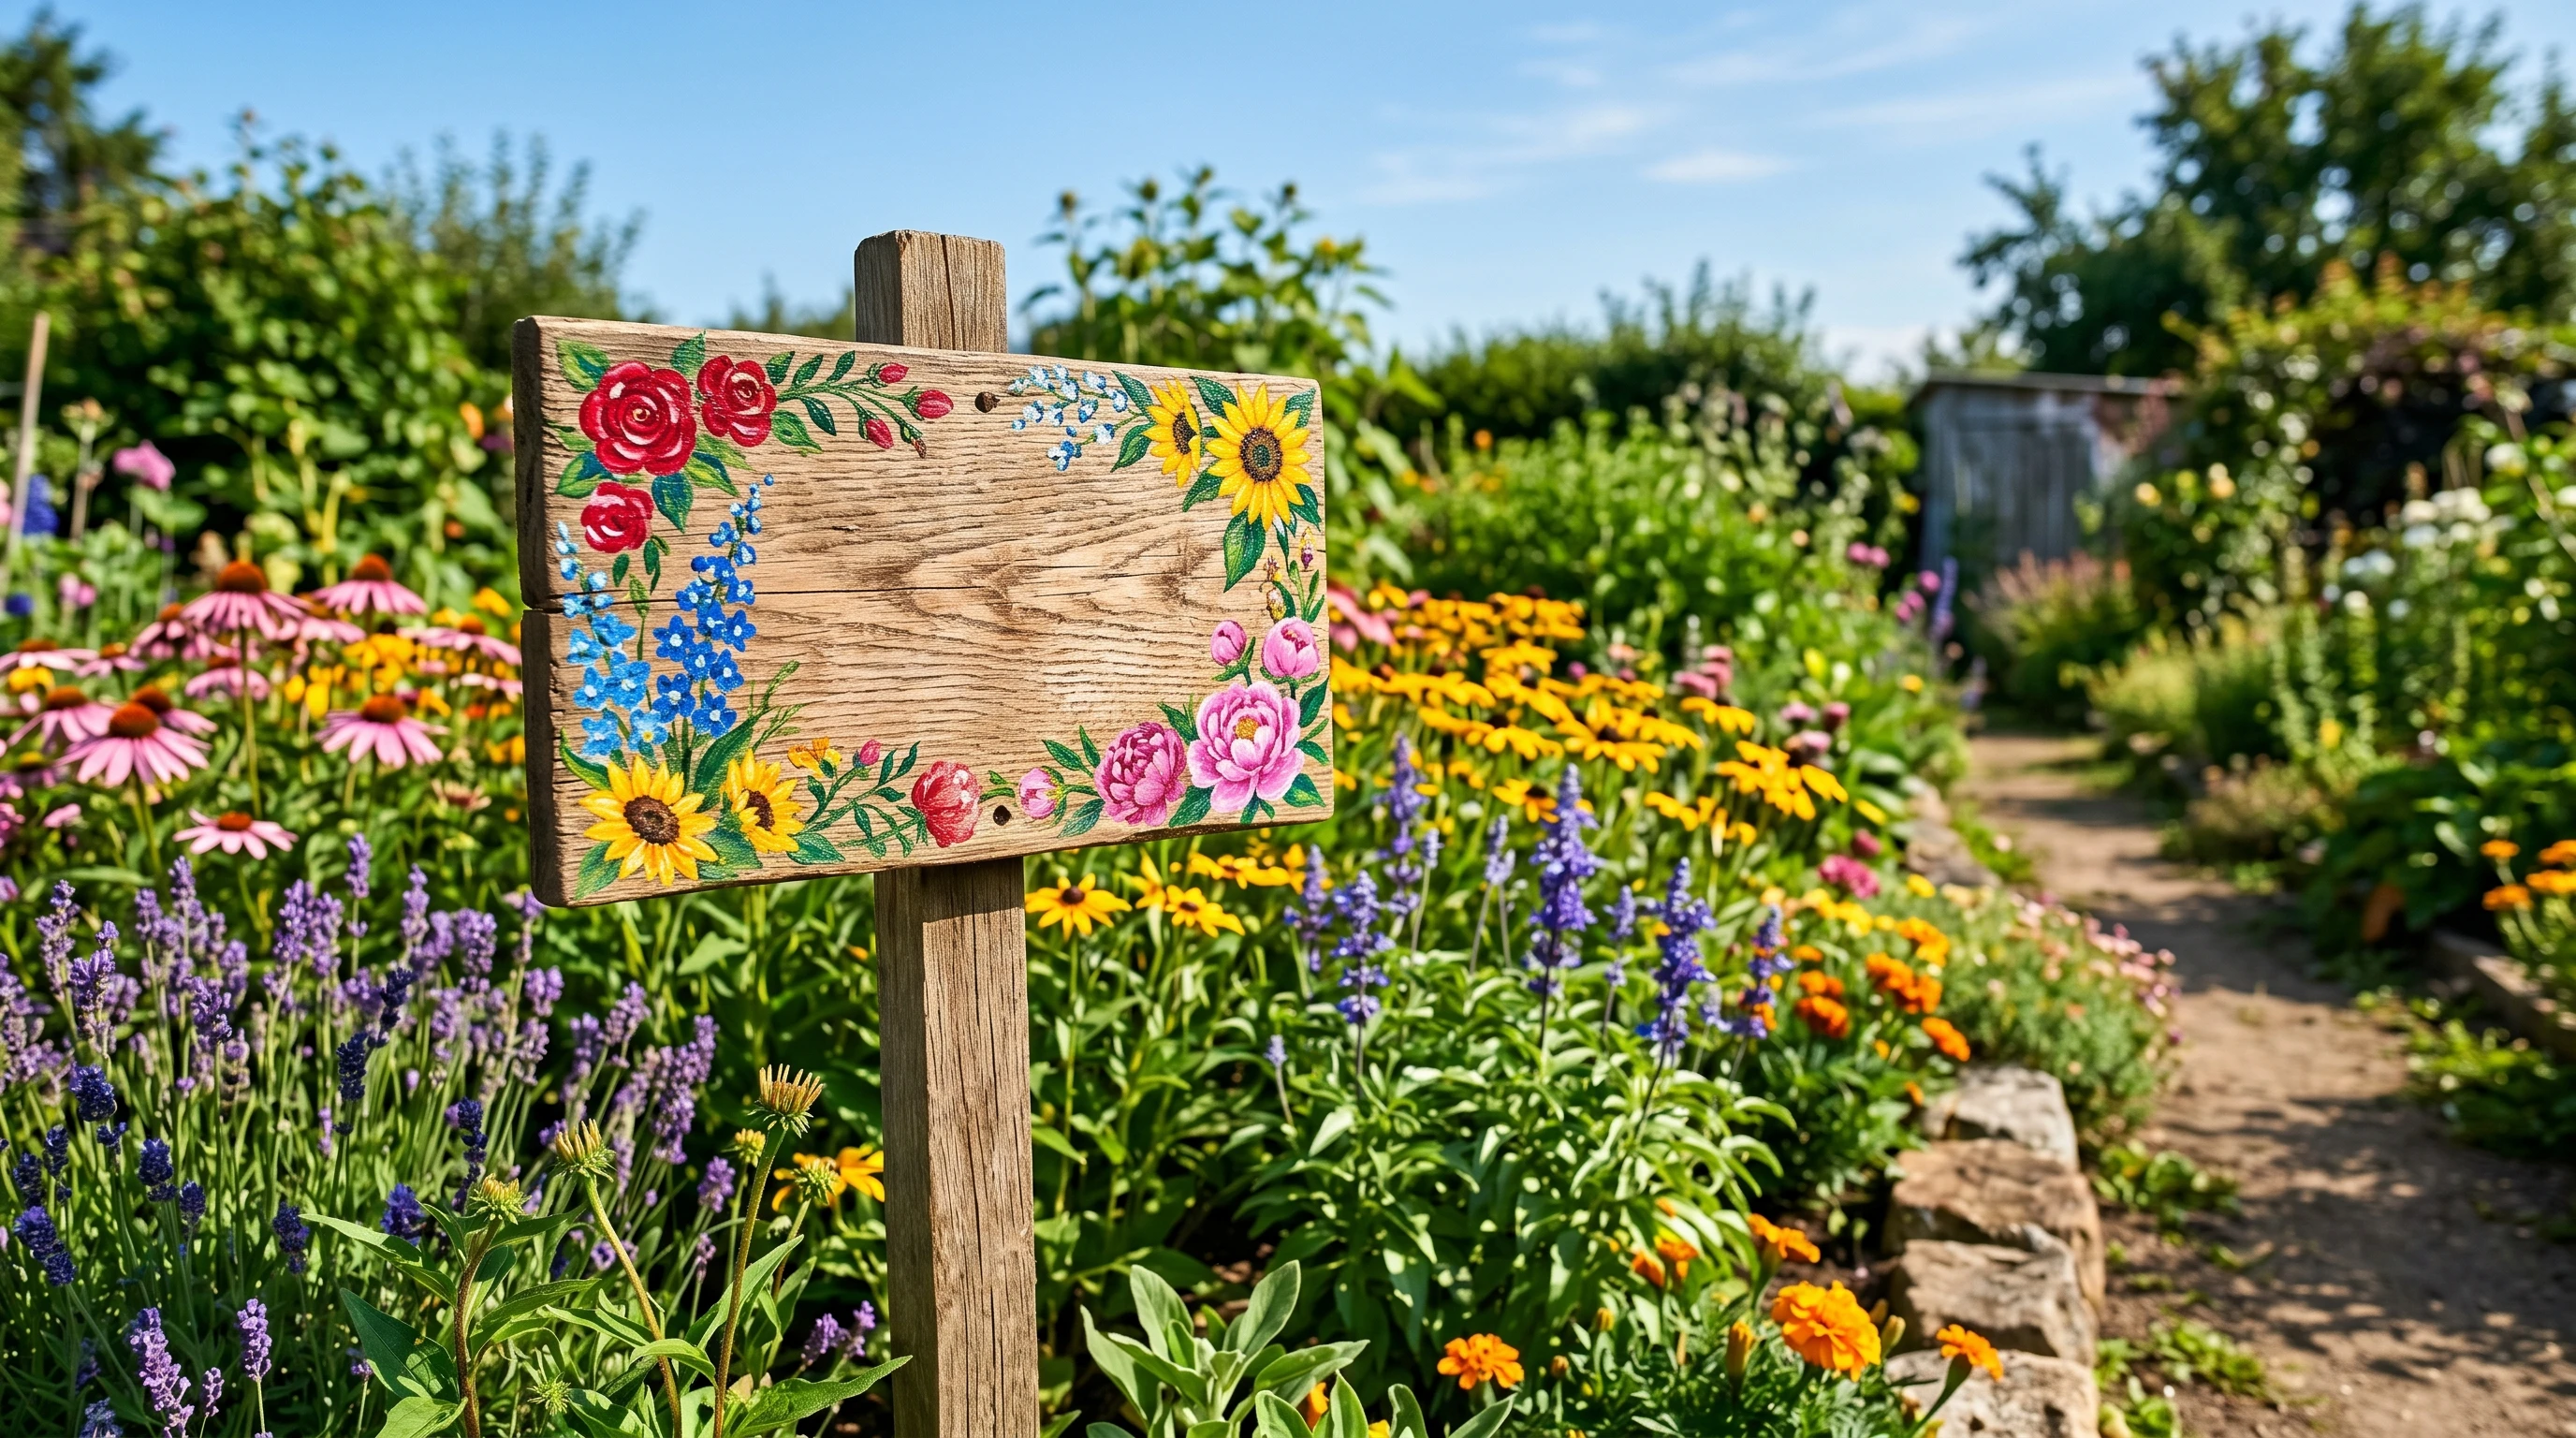
 Painted wood garden signs can add a bright, welcoming touch to any yard, but keeping them looking crisp and colorful year after year can be a real challenge. Rain, harsh sunlight, and even those sudden temperature swings all team up to wear down the paint and wood. If your hand painted sign starts to peel or fade, your whole garden can lose a little of its charm.
If you’ve ever wondered how to stop your beautiful sign from looking tired before its time, you’re definitely not alone. The good news? With just a handful of straightforward steps, you can keep your painted wood garden signs looking fresh longer; this way, you can show off your space with pride. Plus, taking these steps yourself gives you extra satisfaction every time you see your handiwork standing strong and bright.
This article covers my tried and tested maintenance tips for caring for painted wood garden signs. Whether you’re doing the painting yourself or just want to preserve a storebought masterpiece, these steps will help you protect your handiwork from both weather and daily wear. Plus, knowing how to keep your sign looking great makes every stroll through your yard feel just a bit more charming.
1. Choose the Right Spot for Your Sign
Where you place your garden sign matters more than you might think. Sun, rain, wind, and garden tools can all take a toll over time. Picking the best location right from the start helps your sign last a lot longer and keeps those colors looking nextlevel cool.
What to Watch For:
- Direct Sunlight: If you can, avoid placing your sign where it gets punishing afternoon sun all day. UV rays are tough on paint and wood. A spot with partial shade works better and keeps fading at bay.
- Rain and Sprinklers: Keep your sign away from sprinkler zones or areas with poor drainage. Constant wetting can cause bubbling, peeling, and even rot. Ideally, place your sign in an area that gets good airflow but stays mostly dry.
- Wind Protection: Strong winds can force water underneath the paint and blow debris that causes scratches. Tuck your sign where a fence, bush, or wall can block some of that wind, and you’ll get less flying grit scratching up your paint job.
Moving your sign even a couple of feet, such as from an uncovered garden bed to a spot under a small tree, can make a big difference for its lifespan. Choosing the right spot is a simple but powerful way to make the most of your paintwork and ward off wear and tear.
2. Prep the Wood Before Painting
How you prepare the wood makes all the difference in how well the paint sticks and holds up to the elements. Don’t skip these early steps; fresh paint alone isn’t enough for lasting results. If you want your garden sign to truly bring to life your design, preparation is key.
- Sanding is key. Start by sanding the wood to create a smooth surface. Rough spots and splinters let in water and make paint flake off early. A smoother surface helps you get an even coat, so the final finish is eye catching.
- Prime the wood. A good primer blocks stains and keeps moisture from sneaking in underneath your paint. For outdoor signs, look for primers labeled for exterior wood; these are formulated to stand up to rain and sun much better than regular indoor primers.
- Seal all sides. Don’t just paint the front; seal every edge and even the back with primer and an exterior paint. This helps stop water from creeping into seams and cracks and preserves the wood even when the weather gets wild. It might be extra effort, but it’s one of the best investments you can make for a lasting sign.
Even storebought painted signs sometimes miss these steps. If you’re touching up a gift or something from a shop, you can reseal exposed areas for extra protection. Taking a few minutes for prep now means a lot less work later on.
3. Use Paint and Sealer Made for the Outdoors
The type of paint and topcoat you pick plays a huge role in how your sign weathers the seasons. Outdoor paints and clear finishes are designed to deal with rain, sunshine, and big temperature swings. Regular craft paint simply can’t measure up for this job. Always choose products designed specifically for exterior use, no matter how tempting those bright craft paints might look.
Choosing Paint:
- Exterior acrylic latex paint is my go to. It’s tough, flexible, and comes in lots of colors. This type of paint resists cracking and peeling, and you can wash it easily if dirt splashes up on your sign.
- Avoid using oil based paints unless you know your wood can handle it, because while they’re durable, they can yellow over time or become brittle in extreme sun or cold. When oil based paints do work, they’re best for signs in shady, sheltered areas.
Protective Sealer:
- Finish up with a coat or two of a clear, nonyellowing polyurethane or spar urethane made for outdoor wood. Water based sealers are great if you want to avoid strong fumes or yellowing. Choose a matte or gloss finish depending on your style.
- Don’t forget to reseal every year or so. Clear coat is one of the best ways to extend your sign’s bright, fresh look and prevent water damage from setting in. Consistent resealing keeps mildew and fading at a minimum.
For signs with intricate painted details or text, an aerosol spray sealer gives a smooth finish without smudging your work and makes coverage quick and easy. Always let paint cure fully before adding any sealer—follow the directions on every can for the best outcome.
4. Routine Cleaning for Painted Wood Signs
Dirt, dust, bird droppings, and sap can all make a painted sign look old before its time. Regular cleaning doesn’t just freshen things up; it also helps you spot any wear or damage before it becomes a bigger problem. Addressing small issues fast can help your sign look nextlevel cool well past the first season.
Easy Cleaning Steps:
- Use a soft brush or dry cloth to gently wipe away loose dirt or cobwebs. This keeps dust and pollen from building up, which can dull the colors over time.
- If it needs more, mix a little dish soap in warm water. Dip a sponge or soft cloth in the solution and clean the surface without soaking it. Gentle motions work best, so don’t scrub too hard.
- Rinse with a damp cloth, then dry thoroughly with a clean towel. Leaving water on the sign can seep into any small cracks or seams and cause problems down the road.
Skip power washers or rough scrubbing, since these can wreck the finish or even gouge the wood, especially along edges and painted details. If you ever get stubborn spots, let soapy water sit for a while, then gently wipe it away rather than scraping. Consistent gentle cleaning will keep your sign standing out.
5. Quick Touch Ups and Repairs
It’s pretty normal for painted garden signs to pick up a few nicks and chips. Rain, sun, and even accidental bumps can all cause small flaws. Touching up these spots quickly protects the wood underneath and stops peeling from spreading. Rapid fixes really do step up your sign’s overall look and stave off bigger problems later.
- Fill cracks or holes with exterior wood filler before repainting. Make sure the filler is fully dry, then sand smooth for a level finish to make your paint blend right in.
- Blend touchups: Use a small brush and matching paint to patch chips. Feather the edges so they blend into the old color; this keeps repairs from standing out.
- Reseal weak spots: Give extra attention to corners, edges, and any places where the finish looks thin, since they usually show wear first. A touch of clear sealer goes a long way in keeping water and insects from getting in.
I keep a small kit of leftover paint, sealer, and a few brushes on hand for quick fixes. This makes repairs easy, especially after windstorms or heavy rain. Regularly checking and repairing chips and scuffs keeps your sign looking sharp and delays the need for a full repaint.
6. Seasonal Care For Maximum Longevity
A little care at the start and end of each growing season goes a long way. It’s way easier to do quick checks and basic maintenance than to start from scratch when problems get out of hand. Taking time to prepare each spring and button things up in the fall makes a major difference in how long your signs last.
Spring Tips:
- Check for peeling, cracking, or signs of mildew after winter’s wet and cold. A quick onceover now can catch problems while they’re small.
- Clean off dirt or old leaves, then touch up or reseal if needed. Fresh paint always sticks better if the surface is clean and dry, so wait for a sunny day to do your touchups.
Fall Care:
- Give your sign a proper cleaning before winter rolls in. A little soap and water followed by thorough drying helps avoid stains and mildew that build up in the damp months.
- If your area gets harsh winters or heavy rains, bring signs inside or stash them in a sheltered spot until spring. Even the toughest finishes aren’t totally waterproof forever; protecting your sign from deep freezes or constant sogginess helps it last for several years.
A yearly photo can help you keep track of any fading or damage that you missed before; it’s a super easy way to see changes over time. If you like, jot down the dates of any repairs; that way you’ll know exactly how long your paintwork is holding up and can plan for anything that needs attention.
Final Thoughts
Painted wood garden signs brighten up any yard, but a little maintenance keeps them looking good for years instead of just one season. By choosing a good spot, prepping and finishing the wood well, and staying on top of cleaning and repairs, you’ll enjoy your sign’s colors no matter the weather. Plus, adding your personal touch through care and creativity makes your sign stand out from the rest. If you have tips or a favorite paint or sealer you swear by, I’d love to hear about them in the comments!
This is super helpful! Painted signs always look amazing at first, but keeping them that way is the real challenge. The tip about sealing all sides, even the back, is something a lot of people probably overlook. It makes sense though, since moisture always finds its way in from the least expected spots.
Also, I didn’t realise how much placement matters. Just moving it slightly out of direct sun or away from sprinklers sounds like such a simple fix, but it probably makes a big difference over time.
Keeping a small touch-up kit on hand is a great idea too. Way easier to fix small chips early than deal with a full repaint later. This definitely makes maintaining garden signs feel a lot more manageable ????
Btw, how often would you recommend resealing for signs that are fully exposed to sun and rain year-round?
Sharon, this was such a thoughtful comment—thank you for really seeing the details that make the difference over time. You’re absolutely right: a painted garden sign isn’t just a one-time project, it’s more like a little outdoor companion that needs occasional care to stay looking its best.
I love that you called out sealing all sides, especially the back. That’s one of those “invisible” steps that quietly does the heavy lifting. Wood is a bit like a sponge with a memory—if moisture sneaks in from behind, it can undo all that beautiful work from the front. Sealing everything creates a kind of protective bubble that keeps the elements from slowly creeping in.
And your point about placement is spot on. Sun and water are a bit like overenthusiastic houseguests—great in moderation, but too much of either and things start to wear down fast. Even a small shift in location can buy you months, sometimes years, of extra life from your sign.
That touch-up kit idea is one of my favorites too. It turns maintenance from a big, dreaded project into a quick five-minute “garden tune-up.” A tiny chip fixed early is basically a time traveler—it prevents a much bigger repair down the road.
As for resealing, for signs that live fully exposed to sun and rain year-round, a good rule of thumb is about once every 6–12 months. If your sign faces intense sun or harsh weather, leaning closer to every 6 months keeps that protective layer strong. A quick visual check helps too—if the finish starts to look dull, dry, or slightly rough instead of smooth and glossy, that’s your cue it’s time for a fresh coat.
You’ve clearly got a great instinct for this kind of care, and that’s half the battle. Honestly, with the approach you’re describing, your signs are going to stay looking fresh and cheerful far longer than most ????
With Gratitude
Much Love
Have Fun
Richard